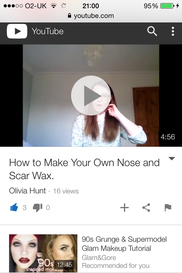
 Click on the picture for the tutorial video!
 Hey lovely people!
Welcome to blog number 2. How to make your own scar wax.
Scar wax is a product which can be purchased from any sort of special effects make up store. It is quite a handy product to have in your make up tool kit.
Scar wax is perfect for cuts, burns, ridges in the skin, and simply prosthetics. It's easy to work with, it blends well and you can create a real skin look and texture with it.
It is super easy to make your own scar wax and all you need is:
1. Vaseline (Petroleum Jelly)
2. Flour
3. Mixing Dish
4 Something To Mix It With.
Step 1.
Scoop out some of your Vaseline into your mixing dish.
Step 2.
Then add your flower. Roughly 1 parts Vaseline to 2-3 parts flour. 1:2-3. Depending on the size of your prosthetic in mind you may need to switch and add more to this ratio.
Step 4.
Just get mixing. Whatever you do... don't stop!
The consistency is key with this. You don't want your wax too sticky or too lumpy as it will be really hard to work with. If too sticky just add more flour, and if too lumpy just add more Vaseline. It really is that simple!
Step 5.
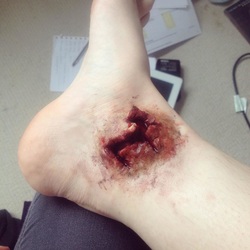
Get moulding and making your amazing creations! Like mine below be totally creative!
I would love to see your pictures of what you have made. If you have instagram tag your photos with the tag #thelifeoflivvy or send me your photo's via direst message to @thelifeoflivvy.
You can send me photo's via twitter @livishowjumper. I will retweet and regram your photo's as well as follow you.
Welcome to blog number 2. How to make your own scar wax.
Scar wax is a product which can be purchased from any sort of special effects make up store. It is quite a handy product to have in your make up tool kit.
Scar wax is perfect for cuts, burns, ridges in the skin, and simply prosthetics. It's easy to work with, it blends well and you can create a real skin look and texture with it.
It is super easy to make your own scar wax and all you need is:
1. Vaseline (Petroleum Jelly)
2. Flour
3. Mixing Dish
4 Something To Mix It With.
Step 1.
Scoop out some of your Vaseline into your mixing dish.
Step 2.
Then add your flower. Roughly 1 parts Vaseline to 2-3 parts flour. 1:2-3. Depending on the size of your prosthetic in mind you may need to switch and add more to this ratio.
Step 4.
Just get mixing. Whatever you do... don't stop!
The consistency is key with this. You don't want your wax too sticky or too lumpy as it will be really hard to work with. If too sticky just add more flour, and if too lumpy just add more Vaseline. It really is that simple!
Step 5.
Get moulding and making your amazing creations! Like mine below be totally creative!
I would love to see your pictures of what you have made. If you have instagram tag your photos with the tag #thelifeoflivvy or send me your photo's via direst message to @thelifeoflivvy.
You can send me photo's via twitter @livishowjumper. I will retweet and regram your photo's as well as follow you.
Today has been a slow day. My car was in for a service so I had a mooch around town. I weirdly didn't buy much but the weather was lovely!
I had a light refreshment at Jaunty Goat cafe which is my favourite new haunt.
I had a light refreshment at Jaunty Goat cafe which is my favourite new haunt.
After splurging out in town I picked up the car and went over to go and see Oscar. He was his usual self and I gave him a lunge which is where I basically stand in the middle of a round pen with a rope attached to Oscar and he goes round in circles. What fun!
Now I am sitting looking through make up websites, currently Selfridges looking at all the gorgeous make up and wishing I had lots of money to spend on it. Though I will be making some purchases (YAY).
That's it for now, thanks for reading guys!
Live Life, Have Fun, Keep Smiling!
Olivia
Now I am sitting looking through make up websites, currently Selfridges looking at all the gorgeous make up and wishing I had lots of money to spend on it. Though I will be making some purchases (YAY).
That's it for now, thanks for reading guys!
Live Life, Have Fun, Keep Smiling!
Olivia
 RSS Feed
